How to connect an external switch or pushbutton
Note:
The push button switch is available with grey or black cable sheath.
Both version have different wire colors. Please find a reference table below.
| function | cable sheath: grey | cable sheath: black |
| input +12V | white | black |
| output | green | blue |
| ground for LED | brown | brown |
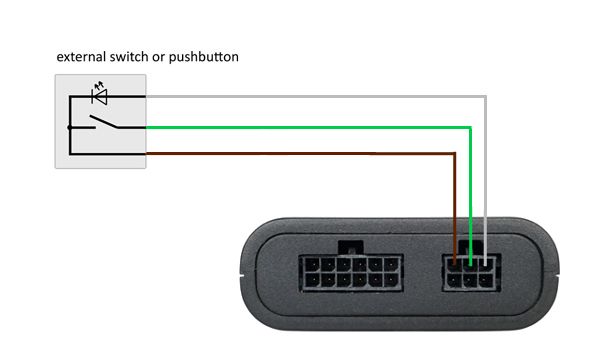
APP-control
The APP-contol has an input for an external switch or pushbutton.
Pushbutton: Each operating of the button will switch on / switch off the heater alternately.
Switch: The heater is on as long as the switch is on. The max. heating time is limited by your configuration.
electrical connection
PIN 4,5 and 6 are reserved to connect the pushbutton / switch.
The connection cord is about 150 cm in length. The crimp-contacts are preinstalled so you can easily insatll the wiring and insert the crimps into the connector housing.
If the app-control was delivered with the universal connection cord, pin 5 is already used. To connect the button you will have to remove this wire first.
PIN 4:
Ground for external LED. Ground signal via a 1 kOhm resistor as long as the heater is switched on.
PIN 5:
Switching input. The heater is switched on as long as +12v are present on this pin.
PIN 6:
Powersupply for external switch (+12V)
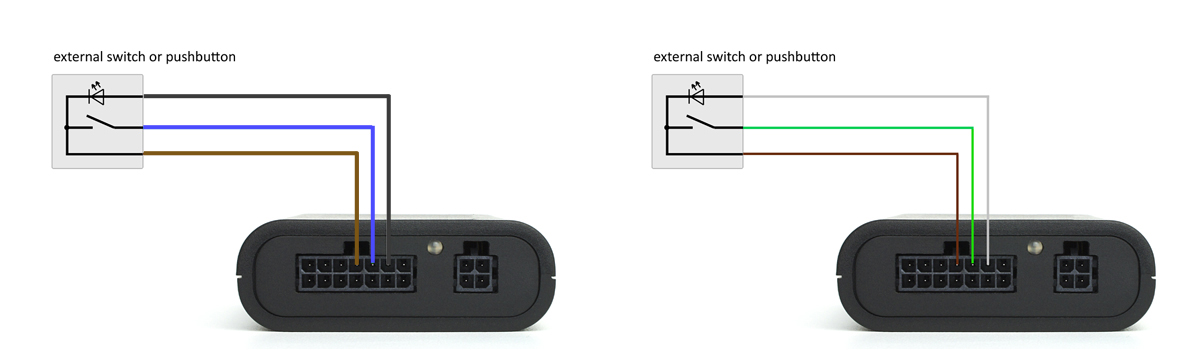
CAN-Gateway VW T6
The CAN-Gateway provides an input for an external pushbutton or switch.
Pushbutton: Each operating of the button will switch on / switch off the heater alternately.
Switch: The heater is on as long as the switch is on. The max. heating time is limited by your configuration.
Note:
The CAN-Gateway are available in two version which have different "pinouts".
The version of your can-gateway can be found at the typeplate at the backside of the device.
Version v1.x

electrical connection
PIN 2, 3 (6-pin connector) and PIN 11 (12-pin connector) are reserved to connect an external switch.
PIN 2:
Switching input. The heater is switched on as long as +12v are present on this pin.
PIN 3:
Powersupply for external switch (+12V)
PIN 11:
Ground for external LED. Ground signal via a 1 kOhm resistor as long as the heater is switched on.
Version 2.x
electrical connection
PIN 1, 2 and 3 (6-pin connector) are reserved to connect an external switch.
PIN 1:
Ground for external LED. Ground signal via a 1 kOhm resistor as long as the heater is switched on.
PIN 2:
Switching input. The heater is switched on as long as +12v are present on this pin.
PIN 3:
Powersupply for external switch (+12V)


